
Articulate Storyline 360: The Essentials & Beyond (2024 Edition)
Learn Articulate® Storyline® 360 with this fun, hands-on workbook in a few days. Written and developed by two veteran trainers, eLearning developers, and Articulate Storyline experts, this is a step-by-step "classroom in a book.” The book includes nearly 150 hands-on activities, dozens of challenge exercises, practice files, and course assets. Most people can finish this book in just a few days. Just add yourself, mix in a little Storyline (the trial version is fine), open this book, and get cooking!
Articulate® Storyline® 360: The Essentials & Beyond (2024 Edition)
Learn to create engaging eLearning with this hands-on, project-based classroom in a book.
Articulate Storyline 360 is among the world's best and most popular eLearning development tools. This workbook is a step-by-step guide that teaches the crucial Storyline features necessary to create effective, engaging, and highly interactive eLearning.
Clocking in at more than 400 pages, this book combines the activities of two previous best-selling workbooks, "Articulate Storyline 360: The Essentials" and "Articulate Storyline 360: Beyond the Essentials." You will find nearly 150 self-paced activities and supporting screenshots. There are dozens of Confidence Checks--challenge exercises that immediately put your newly learned Storyline skills to the test.
You will learn to create projects from scratch, work with slides, add scenes, text, images, characters, animations, and videos.
There are hands-on lessons for adding interactivity to a project with buttons, triggers, conditional triggers, text entry areas, and hotspots.

Learn about variables and how they allow you to create personalized eLearning.
Enhance the learner experience by recording, importing, and editing audio.
Gauge the effectiveness of your eLearning by adding quizzes.
Learn how to create accessible eLearning by adding accessibility text, closed captions, and keyboard shortcuts.
Create immersive Virtual Reality eLearning.
Publish Storyline projects for the web, Review 360, output Word handouts, and create SCORM-compliant content packages appropriate for use in any Learning Management System.
Learn to record and edit incredible software simulations and software demonstrations.

There are even lessons on Action Fine Tuning.
See the Content tab for module-by-module details.
Note: ARTICULATE and STORYLINE are registered trademarks of Articulate Global, LLC in the United States and elsewhere. This website and book are not sponsored, endorsed, administered by, or associated with Articulate Global, LLC.
Preface
- About Articulate 360 and Storyline 360, 2
- Planning eLearning Projects, 3
- Budgeting eLearning Projects, 4
- eLearning Development Phases, 5
- eLearning Development Process, 6
- Designing Storyline Slides, 7
- Fonts and Learning, 8
- Scripts for Software Simulations, 11
- Storyboarding for Soft Skills, 12
Exploring Storyline
- The Storyline 360 Interface, 14
- Explore a Finished Storyline Project, 14
- Explore Slides and Windows, 16
- Scenes Confidence Check, 17
- Zoom and Magnify, 18
- Explore Panels, 20
- Windows Confidence Check, 21
- Indexing, 22
- Renumber Scenes, 22
- Previewing, 23
- Preview the Entire Project, 23
- Previewing and Storyline Options Confidence Check, 25
Creating Projects
- Scenes, 30
- Create a New Storyline Project, 30
- Scenes Confidence Check, 34
- Create a New Storyline Project, 30
- Themes, 35
- Apply a Theme, 35
- Master Slides, 36
- Apply a Content Master Slide, 36
- Master Slides Confidence Check, 38
- Apply a Content Master Slide, 36
- Content Slides, 39
- Insert Slides, 39
- Create a New Content Master Slide, 41
- Apply a Master Slide Layout to a Slide, 43
- Content Confidence Check, 44
Adding Content
- PowerPoint Integration, 46
- Import Content From PowerPoint, 46
- PowerPoint Confidence Check, 48
- Import Content From PowerPoint, 46
- Images, 49
- Insert and Format Images, 49
- Images Confidence Check, 51
- Insert and Format Images, 49
- Text Boxes, 52
- Create and Format a Text Box, 52
- Text Boxes Confidence Check, 53
- Format a Bulleted List, 54
- Text Formatting Confidence Check, 56
- Create and Format a Text Box, 52
- The Content Library, 57
- Insert and Edit an Imported Image, 57
- Cropping and Resizing Confidence Check, 60
- Insert and Edit an Imported Image, 57
- Captions, 62
- Insert a Caption, 62
Buttons, Triggers, and Hotspots
- Buttons and Triggers, 66
- Add Button to a Slide, 66
- Add a Trigger to a Button, 68
- Text Button Confidence Check, 70
- Use an Image as a Button, 71
- Image Trigger Confidence Check, 72
- Edit a Trigger, 73
- Editing Triggers Confidence Check, 74
- Remove Default Player Buttons, 76
- Enable Automatic Slide Advance, 79
- Hotspots, 81
- Insert a Hotspot, 81
States, Layers, and Variables
- States, 86
- Change Button States, 86
- States Confidence Check, 90
- Change Button States, 86
- Layers, 91
- Create Layers, 91
- Layers Confidence Check, 96
- Create a Trigger to Show a Layer, 97
- Triggers and Layers Confidence Check, 99
- Create Layers, 91
- Text Entry Fields, 101
- Insert a Text Entry Field, 101
- Variables, 103
- Manage a Variable, 103
- Reference a Variable, 104
- Conditional Triggers, 106
- Add a Condition to a Button, 106
- Layers and Conditional Triggers Confidence Check, 108
- Add a Condition to a Button, 106
Tables and Number Variables
- Tables, 112
- Insert a Table, 112
- Tables Confidence Check, 114
- Calculation Variables, 115
- Create Variables that Calculate, 115
- Variables Confidence Check, 118
- Adjust a Variable with a Trigger, 119
- Calculation Variables Confidence Check, 123
- Create Variables that Calculate, 115
Audio, Animation, and Video
- Audio, 128
- Insert Audio, 128
- Use Text-to-Speech to Create Audio, 129
- Edit Audio, 131
- Replace Audio, 133
- Inserting Audio Confidence Check, 133
- Recording Audio, 134
- Record Voiceover Audio, 134
- Adding Animation, 138
- Animate an Object, 138
- Animate Text, 140
- Timing Animations Confidence Check, 142
- Animate an Image, 143
- Create an Animation Completes Trigger, 144
- Motion Paths, 146
- Create a Simple Motion Path, 146
- Adding Video, 149
- Insert a Video onto a Slide, 149
- Embed an External Video, 150
- Embedding Videos Confidence Check, 153
Quizzes
- Quizzing, 158
- Insert a Multiple Choice Slide, 158
- Insert a Matching Drop-down Slide, 162
- Quiz Confidence Check, 163
- Insert a Freeform Drag and Drop Quiz Slide, 164
- Insert a Quiz Result Slide, 167
Player Settings and Publishing
- Player Settings, 170
- Add a Resources Link, 170
- Add a Glossary, 172
- Customize the Project Player, 174
- Modify Player Features for Select Slides, 180
- Enable the Seekbar for a Single Slide, 181
- Use the Media Library to Replace an Image, 182
- Publishing, 184
- Publish Course Content, 184
- Publish Confidence Check, 187
- Publish Course Content, 184
Themes and Templates
- Themes, 192
- Create a Theme, 192
- Format a Master Slide, 195
- Master Slide Confidence Check, 197
- Create Layouts, 199
- Custom Layouts Confidence Check, 203
- Save a Theme, 205
- Load a Theme, 206
- Templates, 207
- Add Slide Navigation to the Slide Master, 207
- Navigation Confidence Check, 210
- Variables, 213
- Create Variables, 213
- Variables Confidence Check, 214
- Create Variables, 213
- Progress Indicators, 215
- Add Triggers for a Progress Indicator, 215
- Reuse Triggers Confidence Check, 221
- Create and Use a Template, 222
- Add Triggers for a Progress Indicator, 215
Motion Paths
- Motion Paths, 226
- Preview Completed Motion Paths, 226
- Create a Motion Path, 227
- Modify a Motion Path, 228
- Change the Duration of a Motion Path, 230
- Add a Second Motion Path to an Object, 231
- Motion Path Triggers, 234
- Control “When” a Motion Path Occurs, 234
- Editing Triggers Confidence Check, 236
- Control “When” a Motion Path Occurs, 234
- Triggers and States, 237
- Add Triggers that Reset Motion Paths, 237
- Motion Path Resetting Confidence Check, 239
- Add Triggers that Disable an Object, 240
- Disable States Confidence Check, 241
- Add Triggers that Enable Interactivity, 242
- Enable States Confidence Check, 243
- Add Triggers that Reset Motion Paths, 237
- Triggers and Layers, 245
- Create a “Show Layer” Trigger, 245
- Show Layers Confidence Check, 248
- Create a “Show Layer” Trigger, 245
Advanced Quizzing
- Custom Quiz Question Properties, 250
- Modify Drag and Drop Questions, 250
- Add an Image as Question Feedback, 253
- Branching, 255
- Set Remediation, 255
- Importing Question Data, 260
- Import Questions From a File, 260
- Question Banks, 263
- Create a Random Quiz, 263
- Random Quiz Confidence Check, 266
- Quiz Result Redirection, 267
- Redirect a Quiz, 267
- Redirection Confidence Check, 269
- Create a Random Quiz, 263
Engagement Tactics
- Games and Learner Engagement, 272
- Preview a Completed Project, 272
- Delete Existing Triggers, 274
- Hotspots, 275
- Insert a Hotspot, 275
- Change States, 278
- Make a Trigger Conditional, 280
- Reuse Hotspots and Triggers, 281
- Reuse Hotspots Confidence Check, 282
- Resetting Variables and Slides, 283
- Create a Game Reset Hyperlink, 283
- Reset Slide Properties, 285
- Leveraging Variable Values, 287
- Assign a Variable to Another Variable, 287
- Adjust Variable Values, 289
- Reference a Variable, 291
- Forced Navigation, 292
- Use a Conditional Trigger to Show a Player Button, 292
Video Controls, Sliders, and Dials
- Advanced Video Control, 296
- Embed External Video, 296
- Work with Web Objects, 299
- Edit Video Parameters, 301
- Parameters Confidence Check, 302
- Cue Points, 303
- Add Cue Points to the Timeline, 303
- Cue Points Confidence Check, 304
- Add Triggers Based on Cue Points, 305
- Triggers and Cue Points Confidence Check, 307
- Change a Character’s State Based on Time, 308
- Add Cue Points to the Timeline, 303
- Sliders, 310
- Insert and Format a Slider, 310
- Set Slider Values, 312
- Add Triggers to a Slider, 313
- Sliders Confidence Check, 315
- Dials, 316
- Insert a Dial, 316
- Set Dial Values, 318
- Add Triggers to a Dial, 319
- Dials Confidence Check, 321
- Connect a Dial to a Slider, 322
- Dials and Sliders Confidence Check, 323
Virtual Reality
- Creating Immersive VR eLearning, 326
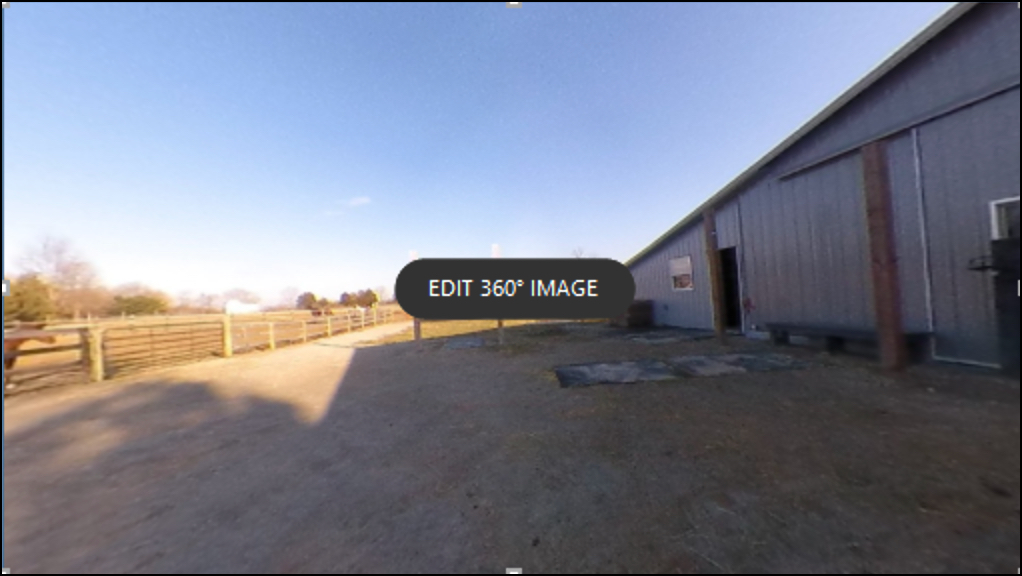
- Add 360° Images, 326
- Add Static Text to a Virtual Reality Slide, 328
- Add a Static Image to a Virtual Reality Slide, 329
- Adding 360° Images Confidence Check, 330
- Set the Initial View for a 360° Image, 331
- Add a 360° Image Marker and Trigger, 333
- Initial View and Markers Confidence Check, 336
- Add a 360° Hotspot and Trigger, 337
Accessibility and Reporting
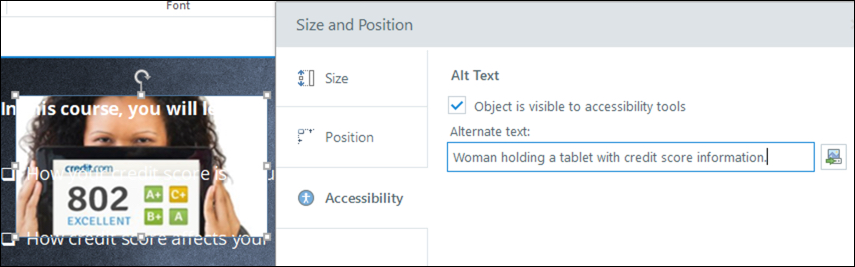
- Accessibility, 342
- Make an Image Accessible, 343
- Image Accessibility Confidence Check, 344
- Control Accessibility Visibility, 345
- Make an Image Accessible, 343
- Focus Order, 346
- Edit the Focus Order, 346
- Keyboard Shortcuts, 348
- Add a Keyboard Shortcut to a Button, 348
- Closed Captioning, 350
- Add Captions from an SRT File, 350
- Show the Closed Captions By Default, 353
- Add Captions Manually, 354
- Manual Closed Captions Confidence Check, 355
- Reporting, 356
- Publish a SCORM-Compliant Package, 357
Recording Your Screen
- Screen Recordings, 362
- Rehearse a Screen Recording Script, 363
- Record a Software Simulation, 364
- Recording Modes, 369
- Insert an Unused Screen Recording, 369
- Adding Modes Confidence Check, 371
- Branching Scenarios, 373
- Create Jumps Between Scenes, 373
- Branching Confidence Check, 376
- Create Jumps Between Scenes, 373
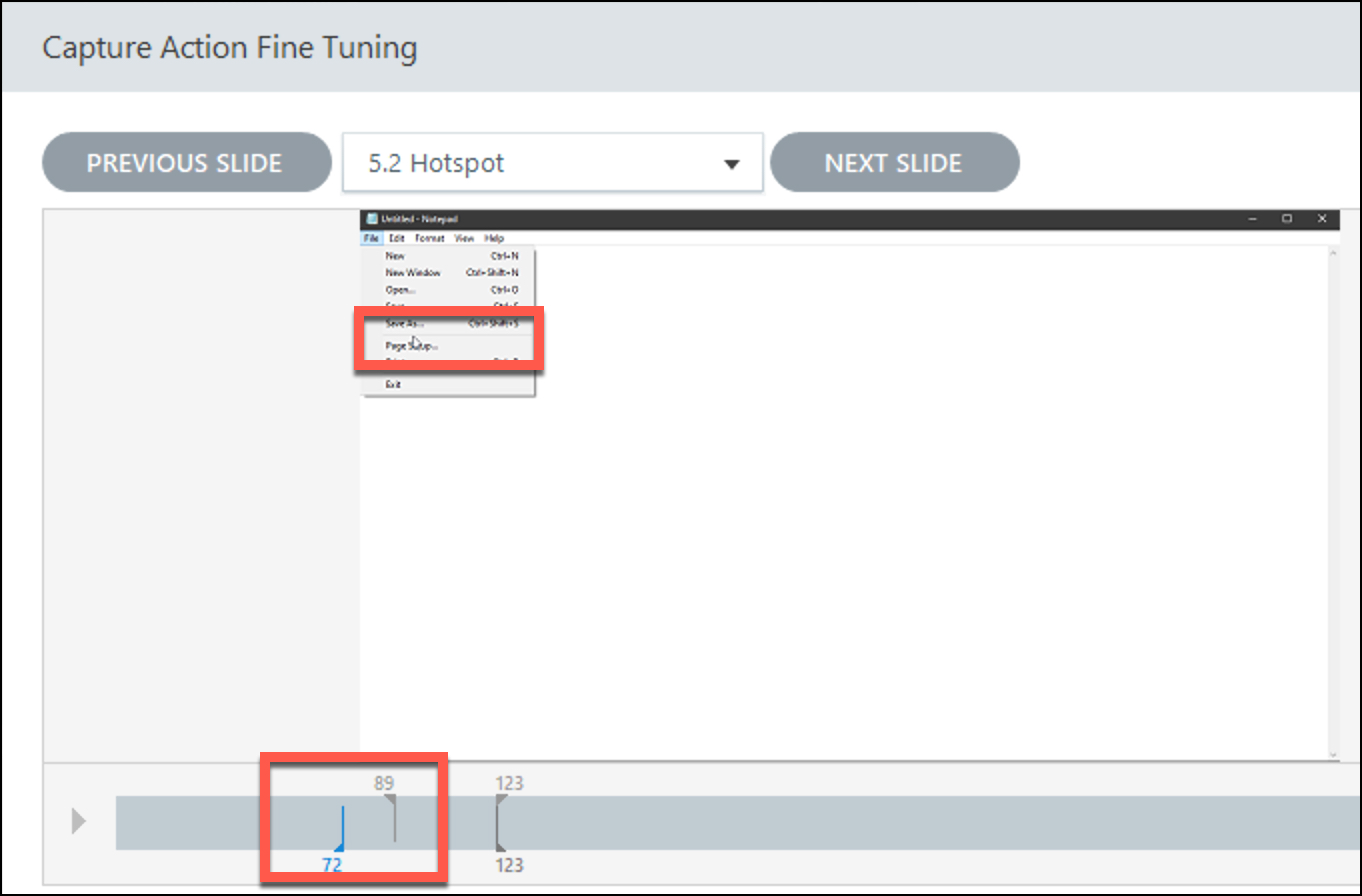
- Action Fine Tuning, 378
- Use Fine Tuning to Remove an Animation, 378
- Action Fine Tuning Confidence Check, 380
- Use Fine Tuning to Remove an Animation, 378
- Microsoft Word Integration, 381
- Use the Translation Feature, 381